Automating my homelab with Ansible
Or: How I stopped playing whack-a-mole with Docker and started feeling like a wizard

After building my DIY NAS (because apparently I hate free time), I thought, “Sure, let’s throw in a few services because I have a better machine. What’s the worst that could happen?” Fast-forward a few months and I was basically running a small “data center” in my bedroom.
And managing it? Absolute chaos.
The problem? Each service had its own docker-compose.yml file with hardcoded paths everywhere. Want to move from /mnt/hdd1/ to /mnt/storage/? Good luck editing 15 different files and hoping you don’t mess up the volume mounts.
1 What was wrong with my setup
Here’s the masterpiece I had cobbled together:
/mnt/hdd1/stacks
├── jellyfin/docker-compose.yml
├── immich/docker-compose.yml
├── qbittorrent/docker-compose.yml
├── frigate/docker-compose.yml
├── ... (you get the idea)
Every single compose file had hardcoded paths:
volumes:
  - /mnt/hdd1/stacks/jellyfin:/config
  - /mnt/hdd1/media:/media
This means:
- Can’t easily move to a different server
- Have to run docker commands manually
- Updates are a pain because I always forget which directory I put each service in
- Adding a new service means copying and pasting from another compose file and hoping I change all the paths correctly
I tried to set up the same services on my laptop for testing. Spent almost 1 hour just fixing paths and port conflicts. There has to be a better way than this.

2 Learning Ansible
I’d heard about Ansible before but never actually used it. Figured it was overkill for a homelab. But after the tenth time I accidentally deleted a config folder (don’t ask), I caved.
Turns out, Ansible isn’t overkill, it’s exactly the kind of lazy automation my future self thanked me for. Write some playbooks, define stuff once, press a button, and boom: deployments everywhere.
Spent a weekend reading docs and watching YouTube videos to get familiar with it. Once I understood the basic concepts, it was pretty straightforward to implement.
3 The setup that actually works
After a lot of trial and error, here’s the structure I ended up with:
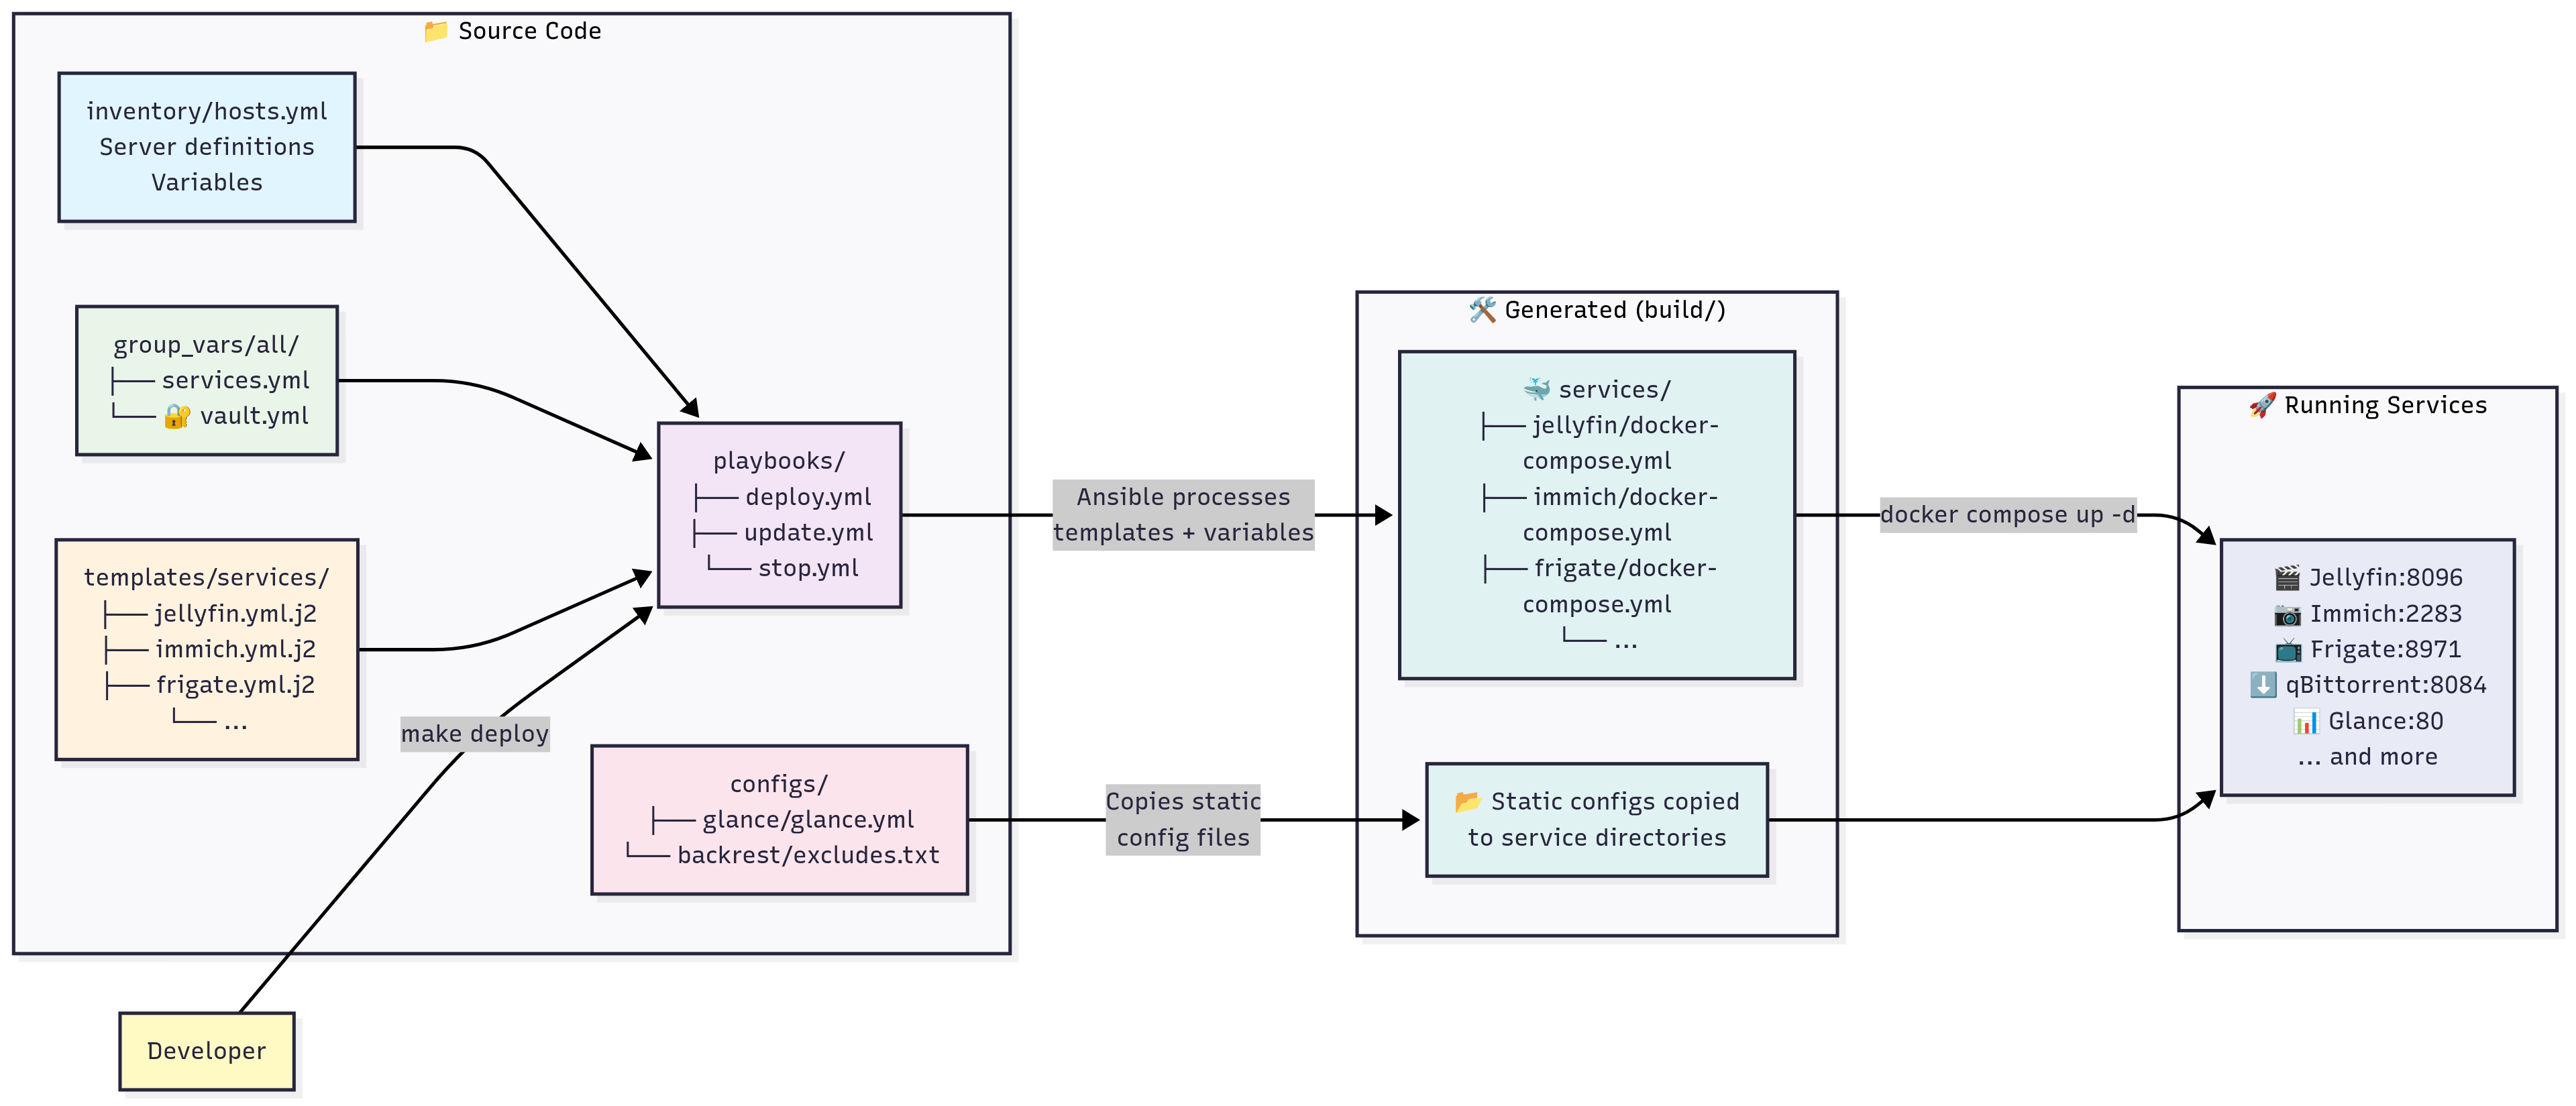
stacks/
├── build/              # Generated files (git-ignored)
│   └── services/
│       └── jellyfin/
│           ├── config/
│           └── docker-compose.yml
├── configs/            # Essential config files
│   ├── glance/
│   │   └── glance.yml
│   └── backrest/
│       └── excludes.txt
├── playbooks/          # Ansible automation
│   ├── deploy.yml
│   ├── update.yml
│   └── stop.yml
├── templates/          # Jinja2 templates
│   └── services/
│       ├── jellyfin.yml.j2
│       ├── immich.yml.j2
│       └── ...
├── group_vars/         # Configuration variables
│   └── all/
│       ├── services.yml   # Service configs
│       └── vault.yml      # Encrypted secrets
└── inventory/          # Host configuration
    └── hosts.yml
Now, let’s me explain why it’s cool.
3.1 One config file to rule them all
Instead of 15 scattered docker-compose files, I now have one group_vars/all/services.yml that defines everything:
services:
  jellyfin:
    enabled: true
    network_mode: host
    memory_limit: "1g"
    config_path: "{{ base_data_path }}/jellyfin/config"
    cache_path: "{{ base_data_path }}/jellyfin/cache"
    media_path: "{{ media_path }}"

  immich:
    enabled: true
    port: 2283
    upload_path: "{{ media_path }}/immich"
    data_path: "{{ base_data_path }}/immich"
    db_password: "{{ vault_immich_db_password }}"  # From vault!
Want to disable Jellyfin? Flip enabled: false. Want to see all ports in one place? Boom, right there. No more YAML scavenger hunt.
3.2 Templates generate the docker compose files
Each service gets a Jinja2 template that generates the actual docker-compose.yml:
# templates/services/jellyfin.yml.j2
services:
  jellyfin:
    image: jellyfin/jellyfin
    container_name: jellyfin
    deploy:
      resources:
        limits:
          memory: {{ services.jellyfin.memory_limit }}
    user: "{{ user_id }}:{{ group_id }}"
    network_mode: '{{ services.jellyfin.network_mode }}'
    volumes:
      - "{{ services.jellyfin.config_path }}:/config"
      - "{{ services.jellyfin.cache_path }}:/cache"
      - type: bind
        source: "{{ services.jellyfin.media_path }}"
        target: /media
        read_only: true
    restart: 'unless-stopped'
All those {{ variables }} get replaced with actual values when Ansible runs. Change the path in one place, and it updates everywhere.
3.3 Passwords are encrypted
# group_vars/all/vault.yml (encrypted)
vault_immich_db_password: "super-secret-password"
vault_samba_password: "another-secret"
vault_gotify_password: "you-cant-see-this"
I finally stopped living dangerously. Ansible Vault encrypts everything. So if someone ever gets access to my git repo, all they’ll get is a pile of unreadable nonsense instead of my supersecret123 password.
3.4 Simple commands for everything
I got tired of typing long Ansible commands, so I made a Makefile. Now I just summon services like a wizard:
# Deploy everything
make deploy

# Deploy one service
make deploy-service servicename

# Update all services
make update

# Check service status
make status

# View logs
make logs

# Stop everything (nuclear option)
make stop
When I run make deploy, here’s what happens:
- Creates all the directories (like
/data/jellyfin/config) with the right permissions - Generates docker-compose.yml files from the templates
- Copies config files (like my Glance dashboard config) where they need to go
- Pulls the latest Docker images
- Starts everything up
- Shows me what’s running and where to access it
Takes about 30 seconds total. Way better than running commands manually.
- One config file that defines all my services
- Templates that spit out compose files automagically
- Centralized paths (change it once, done everywhere)
- Encrypted passwords (because maybe I do care about security)
- One magical spell:
make deploy
4 Why it’s a total game-changer
Disaster recovery: My server died last month. Old me? Three hours of “uhhh, what did I do last time?” New me? One command. Coffee’s still warm when everything’s back up.
Development workflow: I can spin up the exact same setup on my laptop for testing. Same configs, same everything (just adjusted paths for local testing). No more “it works on my server but not locally” headaches.
Sheer joy: Watching 15 services spin up in seconds with make deploy? Honestly, it’s nerd nirvana.

5 Should you bother?
If you’re running two services, meh, stick with your YAML spaghetti. But if you’re past five, or you’ve ever wanted to yeet your server out the window during an update… trust me, Ansible will save your sanity.
The time investment upfront was worth it. Took me a weekend to set up, but I’ve probably saved hours already just from not having to manually manage everything.
6 Conclusion
Infrastructure as Code sounds super enterprise-y, but really it’s just: “put your server setup in files so you don’t forget how you did it.” My homelab went from fragile chaos to something I can rebuild in minutes. And yes, I’m unreasonably happy about it.
7 Get the code
The complete Ansible setup described in this post is available on GitHub: https://github.com/Ashpex/homelab
The repository includes all the playbooks, templates, configuration files, and detailed setup instructions. Feel free to fork it and adapt it to your own homelab needs!
If you think there’s something to make this setup better, please leave a comment down below. I’m happy to hear your thoughts and ideas!
 Support Me on Ko-Fi.com